Check back soon
Once posts are published, you’ll see them here.


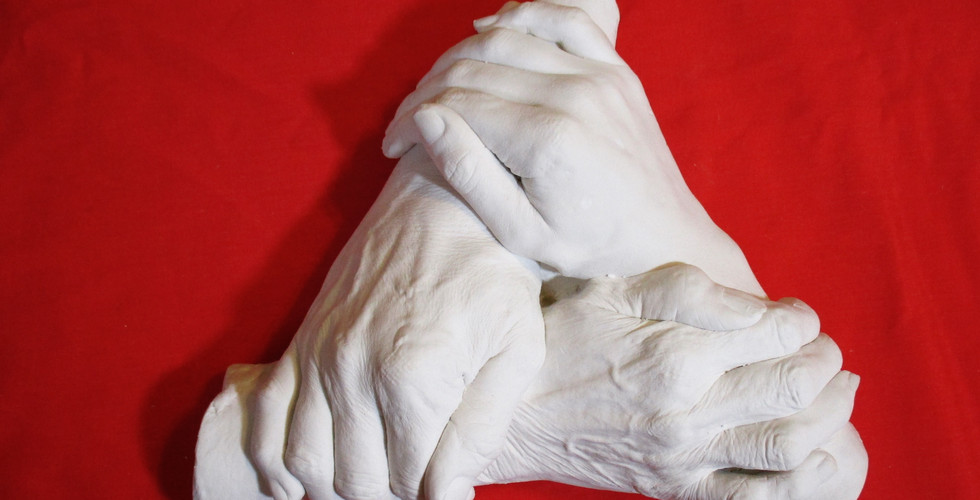
Good Afternoon! I'm so excited to share with you this glorious piece of art that my family and I created with Casting Keepsakes! For those of you who are unfamiliar with this company, Casting Keepsakes offers all kinds of casting molds that you can use at home to create sculptures. This was the first time I had ever done anything like this before so I was extremely eager to test it out and I think the hand casting turned out fairly well!
Items Included in Box - Items Needed -
(1) Create-A-Mold (Molding Powder) • Large Mixing Bowl
(4) bags of Casting Stone (2 lbs. each) • Measuring Cup
2 Plaster Bandage Rolls • Large Mixing Spoon, Spatula or Whisk
1 Sanding Screen • Scissors
Plastic Water Tray
De-molding Stick
Detailing Pin
2 Pairs of Non-latex Gloves
Plastic Drop Cloth
2 Pieces of Sand Paper
I'm going to try my best to explain the process in a short and sweet manner. It's best if you have 1 or 2 people who aren't apart of the casting to help you. First, you need to practice hand placement. How many hands are you casting? Can you all easily reach each other? Make sure you have it down-pat. You also want to make sure that your hands are laying on top of the plastic bag that is provided. Next, you need to mix the molding powder with some water, then pour it over the hands that are to be cast. You will then need to take some of the bandages and lay them over top of the mold (very quickly) while it is still wet and sticky. Next, you take more bandages that you have dropped in warm water to place over the first layer of bandages. Keep placing the bandages until all the molding is covered.
Once you let your hands set in the mold for a couple of minutes, slowly and carefully wriggle your hands out from under the mold until you are all free. Make sure to cover the wrist holes with wet bandages. Let the bandages/mold harden. Once hardened, flip the mold over and fill it in with the Casting Stone once you've mixed it with water. Make sure to fill it to the top. Let the stone harden for 3-4 hours and then you can begin to remove the bandages. Once you've removed the bandages, you can go back and fill in any cracks or air holes with leftover, wet casting stone. You can also sand the wrists and any rough spots on your sculpture as well as chisel away any chunks of stone that are not a part of the hands and use the detailing pin to remove pieces of stone (and excess rubber from mold) from in between fingers. After that, set your sculpture aside and allow it to dry for 7-10 days. You can finish it off with sealant for extra protection, if you wish, once it is dry.
My Final Thoughts
This process seems a little more difficult than it really is. It takes patience, but it truly is a pleasant bonding experience for everyone involved in the activity. We had a great time full of laughs and fun! It's incredibly entertaining to do the detailing work at the end. I can't believe how beautiful it is! You can see all the details in the fingers, hands and wrists. It's an emblem that you can hold onto forever to remember loved ones and/or friends! I highly recommend giving it a try because it's a unique activity that makes you smile! Be sure to check out Casting Keepsakes and look at all the different types of molds they offer. I guarantee you'll enjoy the experience!


Comments